Minecraft Server Proxy
Posted on
I host almost everything locally, but I needed a good way for friends to reach in to our Minecraft server. This is a jank but so far effective solution.
The plan
Friends will be connecting to my server through a domain name directing to a vm
hosted by Digital Ocean1, forwarding network traffic on port 25565 using
socat2 to my personal server through Tailscale, as diagrammed below.
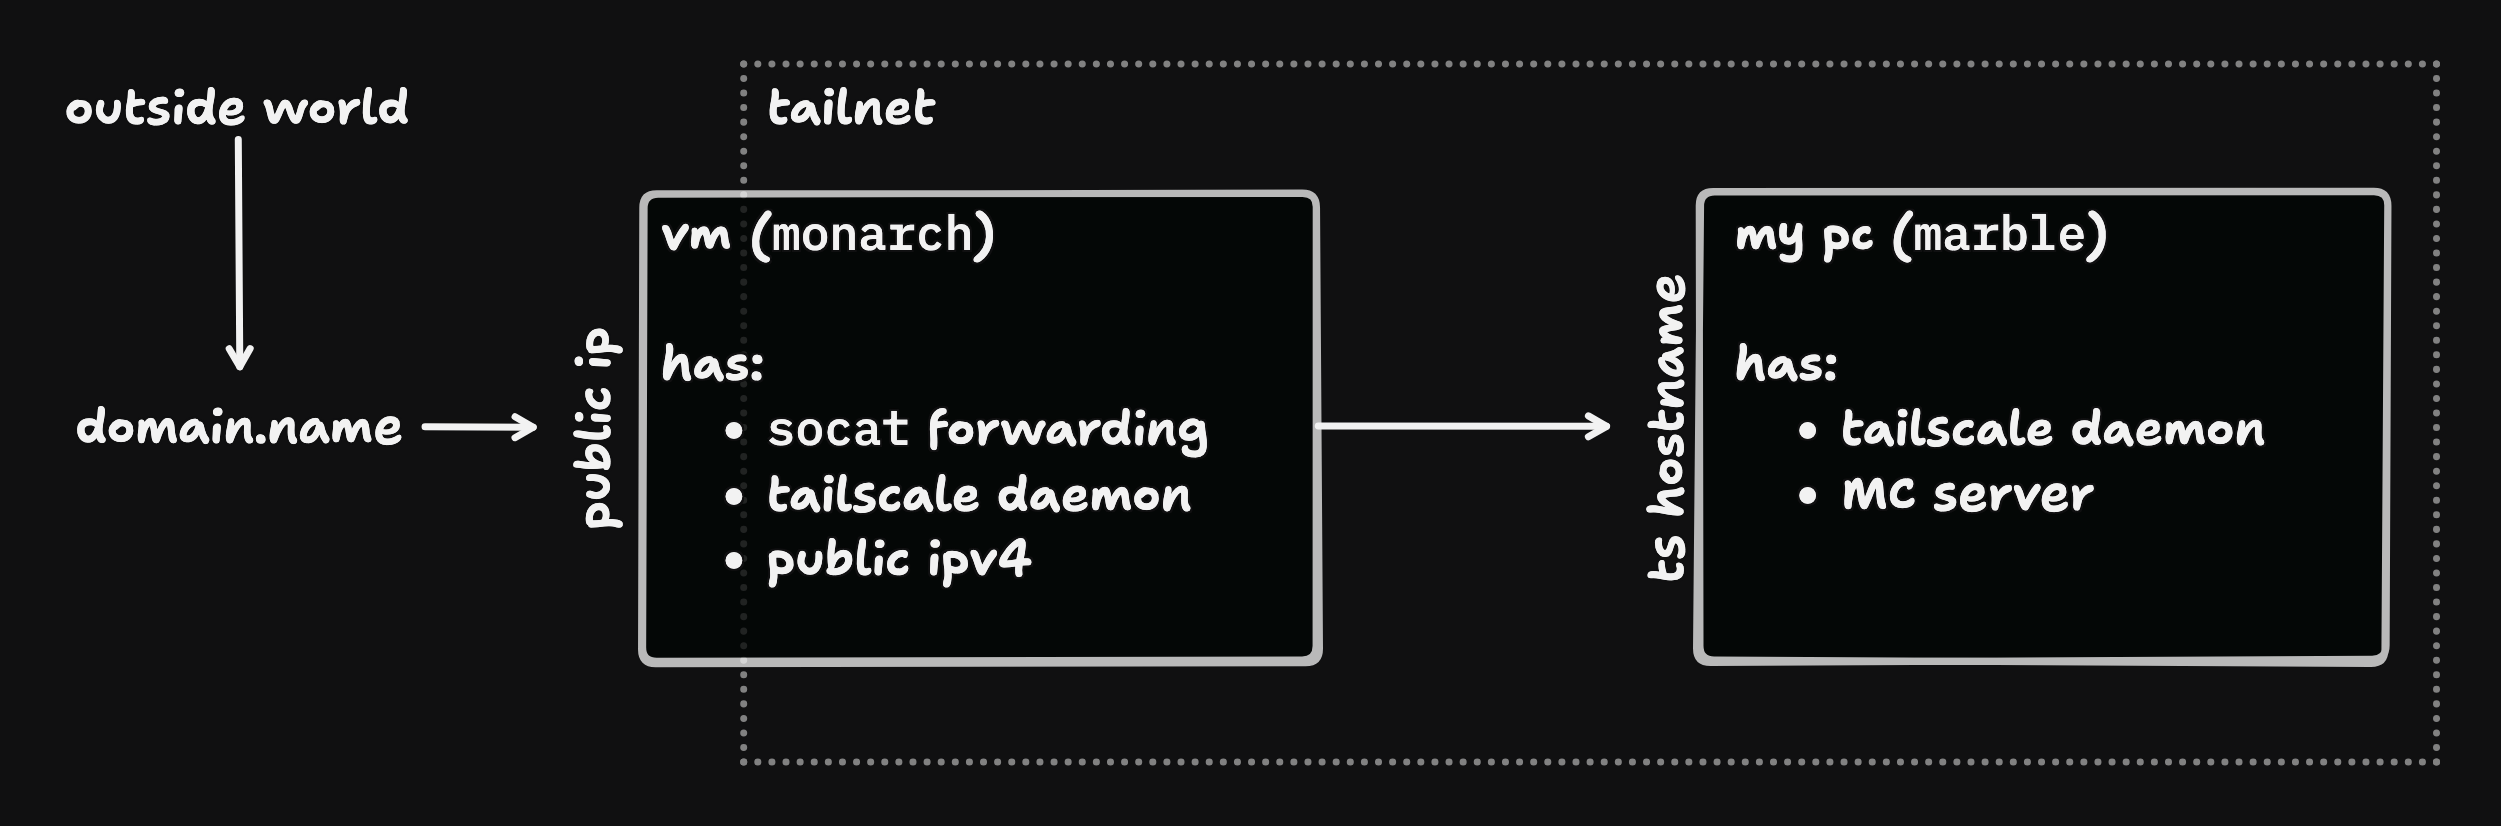
This sounds like a lot, but in reality it has 3 steps for me, and at most one or two more for you.
The steps:
- Setup VM in Digital Ocean
- Setup Tailscale on that VM
- Run
socatcommand in tmux on that VM, detach, and call it a day - Optional: Connect Domain Name
You'll notice that there's no setting up auto start scripts, configuring systemd, installing docker, or anything like that. That is because this is the jank solution that I can spin up again in 5 minutes if it goes down. The uptime agreement for this service is "fix it if my friends bug me about it being down before I notice it being down" so we'll be aiming for roughly one 9 of uptime.
Setup VM in Digital Ocean
Note: this could be in any cloud service provider. At the time of writing Digital Ocean had 4$ / month VM with 1 shared CPU and 500gb of outbound network traffic included. This would be enough speed and data to forward all of my network traffic in the month through while staying within that 4$ budget.
-
Navigate to this Create Droplet Page which should be pre-populated with:
- New York (This VM options is not available in all regions, but worth checking for a closer regions if this is far from you)
- Debian 13
- Droplet Type: Basic
- 1 vCPU
- 512 MB ram
- Regular SSD -4$/month VM
-
Create or add an ssh key, and select it as the Authentication Method
-
I recommend giving it a custom Hostname, mine is called McProxy. This name is not important for later configuration, but makes finding it on the dashboard easier.
-
Click Create Droplet
Setup Tailscale on that VM
- Connect to the VM through the web
sshconsole - Install
tailscale, following their instructions
- If not setup with Tailscale on your server already, install there as well
- Set the hostname of the machine to
monarch(or your preferred name) for ease of identification, and because this is a pet, not cattle. This is what the VM can be reached at from anything hooked up with Tailscale - I also recommend setting a hostname for your server if you haven't. I call
mine
marble
Run socat
Back On monarch (Our VM):
-
apt install tmux, to let us disconnect without killing the command3 -
Run
tmux -
Forwarding with
socatsocat TCP4-LISTEN:25565,fork TCP4:marble:25565Note: the
marblein this command must be swapped with the Tailscale hostname of your server -
Disconnect from the session with the key combo:
Ctrl-B d
From here we server configuration should be all set. You can confirm this by connecting to the VM's IP from you Minecraft client.
Optional: Connect Domain Name
In my case this is an "A Record" on a subdomain configured through Namecheap's Dashboard, but your steps may differ slightly here.
- Namecheap Dashboard
Manageon 'domain.name'Advanced DNStab- Add (or Update existing) A Record pointing to the IP of the VM we just setup
The why
I am not running the Minecraft server directly on the VM since that VM is less powerful than my local server.
I can't port forward due to my ISP. Well. I can, but they would want to charge extra (more than this VM costs) for the privilege. I can't change from this ISP in my current apartment, so this workaround is necessary.
Using Digital Ocean only because it was the first one who would take my credit card. Tried a couple other cheap options but couldn't get past perplexing payment processing problems.
I'm sure nginx could do this with a minimal config, or some other similar reverse proxy. I thought caddy would be able to, and in theory it still could but will need a bit more finagling. For now this works.